
Mortal Shell 2 Slayer Seal — Location, Effects & Achievements
Find the Mortal Shell 2 Slayer Seal in Marrow Keep. Learn how Gloomslayer and Slayer Punch work, plus the permanent achievement warning before you equip it.
The Mortal Shell 2 Slayer Seal is a free Easy Mode item found on the Magnificent Seat in Marrow Keep. Picking it up is safe, but equipping it permanently disables achievements or trophies on that save, even after the Seal is removed.
| Property | Answer |
|---|---|
| Location | Magnificent Seat, Marrow Keep |
| Type | Seal / Easy Mode modifier |
| Cost | Free |
| Main ability | Gloomslayer |
| Special attack | Slayer Punch |
| Makes the game easier | Yes |
| Achievement impact | Permanent lock on the save once equipped |
Slayer Seal Location — Where to Find It
The Slayer Seal sits on the Magnificent Seat, a stone throne in the corrupted clifftop area of Marrow Keep. Start near the Marrow Keep beacon, follow the nearby tunnel toward the outer cliffside, and look for the throne with the glowing pickup.
View the Magnificent Seat and Marrow Keep on the world map →
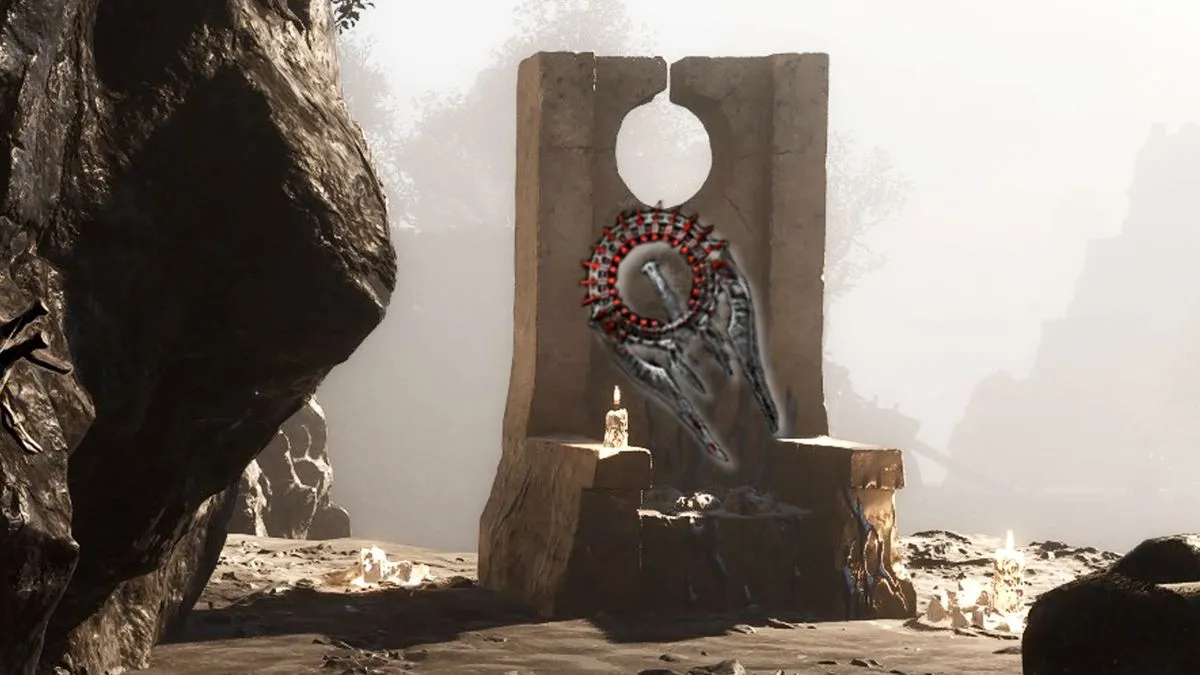
There is no purchase, boss fight, key, or puzzle requirement. Interact with the throne to add the Seal to your inventory. Collecting it does not affect achievements.
How to Get the Slayer Seal Step by Step
- Reach Marrow Keep and activate its beacon.
- Enter the tunnel leading from the Keep toward the outside cliff area.
- Find the stone throne known as the Magnificent Seat.
- Interact with the glowing item to collect the Slayer Seal.
- Leave it unequipped if you want achievements on that save.
The achievement restriction begins only after you select the Seal and accept both warning prompts.
What Does the Slayer Seal Do?
The Slayer Seal replaces a conventional defensive Seal ability with a Break-focused combat loop. Sidearms build enemy Break, successful Ripostes restore resources, and Slayer Punch provides a powerful way to close distance and force a Riposte.
It makes difficult encounters more forgiving, but you lose the active parry, guard, or harden behavior supplied by other Seals while it is equipped.
Gloomslayer Explained
Gloomslayer makes sidearm attacks deal Break Damage. Each hit advances the enemy’s Break meter, allowing you to create Riposte openings from range instead of relying entirely on close combat.
Successful Ripostes also restore Health and Resolve. This gives the Seal its sustain: ranged pressure creates a Break, the Riposte deals damage, and the resource recovery helps you continue the fight.

Slayer Punch Explained
Slayer Punch is a charged attack that grants protection while you rush forward and deals heavy Break Damage. If the punch fills the target’s Break meter, it automatically starts a Riposte.
A practical sequence is to build most of the meter with sidearm shots, then use Slayer Punch to cross the remaining distance and trigger the finisher. Against groups, wait for a safe opening because the attack commits you toward one target.
Does the Slayer Seal Disable Achievements?
Yes. Equipping the Slayer Seal permanently disables further achievements or trophies on that save file. Removing it later does not restore eligibility.
The safe distinction is simple:
- Picking up the Slayer Seal: safe.
- Keeping it in your inventory: safe.
- Equipping it and accepting both prompts: permanently flags that save.
- Unequipping it afterward: does not remove the flag.
Use another save if you want to test the Seal while preserving a completion run.
Can You Remove the Slayer Seal?
Yes. You can unequip it and switch to another Seal at any time. This restores the other Seal’s combat ability, but it does not restore achievements on a save already flagged by the Slayer Seal.
Do not equip it for a single boss with the expectation that achievements will resume afterward. The warning applies to the save, not only to the time the item remains active.
Is the Slayer Seal Mortal Shell 2’s Easy Mode?
Yes. It is the game’s optional Easy Mode even though it appears as equipment rather than a menu setting. Its Break pressure, protected punch, automatic Riposte interaction, and resource recovery reduce the execution demands of many fights.
For the full comparison with Default difficulty and Night Mode, see the Mortal Shell 2 difficulty settings guide.
Should You Use the Slayer Seal?
Use it when the normal combat difficulty is preventing you from enjoying or finishing the game and you do not need achievements on that file. Avoid it on a first-run completion save or any file intended for a Platinum or 100% achievement run.
| Goal | Recommendation |
|---|---|
| Earn every achievement or trophy | Do not equip it on that save |
| Finish the story with easier combat | Use it on a separate or non-completion save |
| Test Slayer Punch | Duplicate or back up the save first where possible |
| Already equipped it | Continue without achievements or use a clean save |
Slayer Seal vs Normal Difficulty
| Feature | Normal Difficulty | Slayer Seal Equipped |
|---|---|---|
| Sidearm Break Damage | Depends on your normal loadout | Added by Gloomslayer |
| Riposte recovery | Depends on Seal and build | Restores Health and Resolve |
| Special approach | Standard Seal ability | Slayer Punch |
| Achievements | Enabled | Permanently disabled on that save |
| Best for | First runs and completion | Lower-friction or separate runs |
Frequently Asked Questions
Does collecting the Slayer Seal disable achievements?
No. The lock begins when you equip the Seal and accept the confirmation prompts, not when you collect it.
Does removing the Slayer Seal re-enable achievements?
No. You can remove the item, but the achievement restriction remains on that save.
Is the Slayer Seal free?
Yes. It is a pickup on the Magnificent Seat in Marrow Keep and costs no currency.
Can the Slayer Seal and Night Mode be used together?
They are independent systems, so the Seal can be equipped while Night Mode is active. The achievement lock still applies.
Watch: Slayer Seal in Action
This combat demonstration shows Gloomslayer, Slayer Punch, and the Seal’s Break-focused playstyle.

Slayer Seal Combat and Easy Mode Demonstration
Gallery
Related Articles
guides
Mortal Shell 2 Achievements - Complete Trophy Guide
Mortal Shell 2 achievements guide with the full trophy list: 53 PlayStation trophies, 52 Xbox/Steam achievements, every unlock condition, and Platinum tips.
beta
Mortal Shell 2 Beta: Access, Shells, Weapons & Seals
Mortal Shell 2 beta is on Steam and consoles. Learn what's included, which Shells and weapons appear, how Shell Bonding works, and progression details.
guides
Mortal Shell 2 Difficulty Settings — Easy & Hard Mode
Mortal Shell 2 has no traditional difficulty menu. Learn how the Slayer Seal works as Easy Mode, how Night Mode raises difficulty, and what each option changes.
Was this helpful?
Thanks for the feedback!